
The purpose of guiprep is to take Optical Character Recognition (OCR) output in the form of text files or rtf files, extract any formatting, rejoin end-of-line hyphenated words, filter out bad and undesirable characters, check for common scannos[*] and check them for zero byte files to help automate preparation of files for our site (Distributed Proofreaders). If the proofing images accompany the text, guiprep can rename the png files and optimize them. Guiprep supports queuing up several projects and processing them as a batch. Guiprep semi automates header and footer removal, including hooks to link in a text editor and image viewer to check the files.
*[A scanno is like a typo...only from a scanner instead of a typist.]
This manual is based on version .41e of guiprep.
There is a history of modifications to the program in the installation package (changelog.html). Guiprep was originally written by Steve Schulze (thundergnat). Please leave any questions or comments in the Guiprep forum at Distributed Proofreaders.
Portions of this script are derived from
RTF::Tokenizer by Peter Sergeant.
For more information on the RTF file format, SEE: The_RTF_Cookbook
by Sean M. Burke.
The included pngcrush.exe is a windows/dos compiled version of pngcrush, a png file compression tool. It will losslesly reduce the size of png files. Most image creation programs do not optimally compress png files. Get the latest version of pngcrush.exe at sourceforge (make sure you get the executable unless you are planning to compile it yourself) or go the the pngcrush home page for more information. The version included with the script is the lowest common denominator version. If you have a MMX capable processor, a faster, MMX enabled version is available. Uncompress it and place it the pngcrush directory in the guiprep folder. Make sure the included readme text file is named "README.txt" so the help button can find it. Some distributions I have seen have the help file named just "README".
This software has no guarantees as to its fitness to do this or any other task. Any damages to your computer, data, your mental health or anything else as a result of using this software are your problem and not mine. If not satisfied, your purchase price will be cheerfully refunded.
This program may be freely distributed, used, and modified. Reverse engineering is condoned and encouraged. If you come up with some really cool addition (or even just an idea) post it in github, and it may be included in future releases.
Installation is explained in the files INSTALL.md and UPGRADE.md in the distribution package. Please see those files for details.
There are two different dehyphenization routines. One works with a single set of files, the files with line breaks preserved; the format needed by the Distributed Proofreaders site. The other will use two sets of files, one set with line breaks and one set without. The two sets will yield better accuracy during dehyphenization at the expense of slightly longer processing time and more disk storage space. To do two set dehyphenization, save the text from ABByy FineReader (or possibly other OCR packages; should work as long as they produce standard, well formed rtf or text files) two times in two different directories. Within one directory, you will need two sub-directories "textw" and "textwo". The parent directory could be the project directory, or other. "textw" stands for "text with line breaks" and "textwo" stands for "text without line breaks". If you are only going to do single set dehyphenization, you only need to follow the instructions for the "textw" directory.
In ABByy after all of your images are loaded and OCRed, select File => Save Text As => RTF.
In the dialog box that pops up navigate to the textw directory, or if the directory does not yet exist, create a textw directory in some appropriate parent directory using the New Folder button.
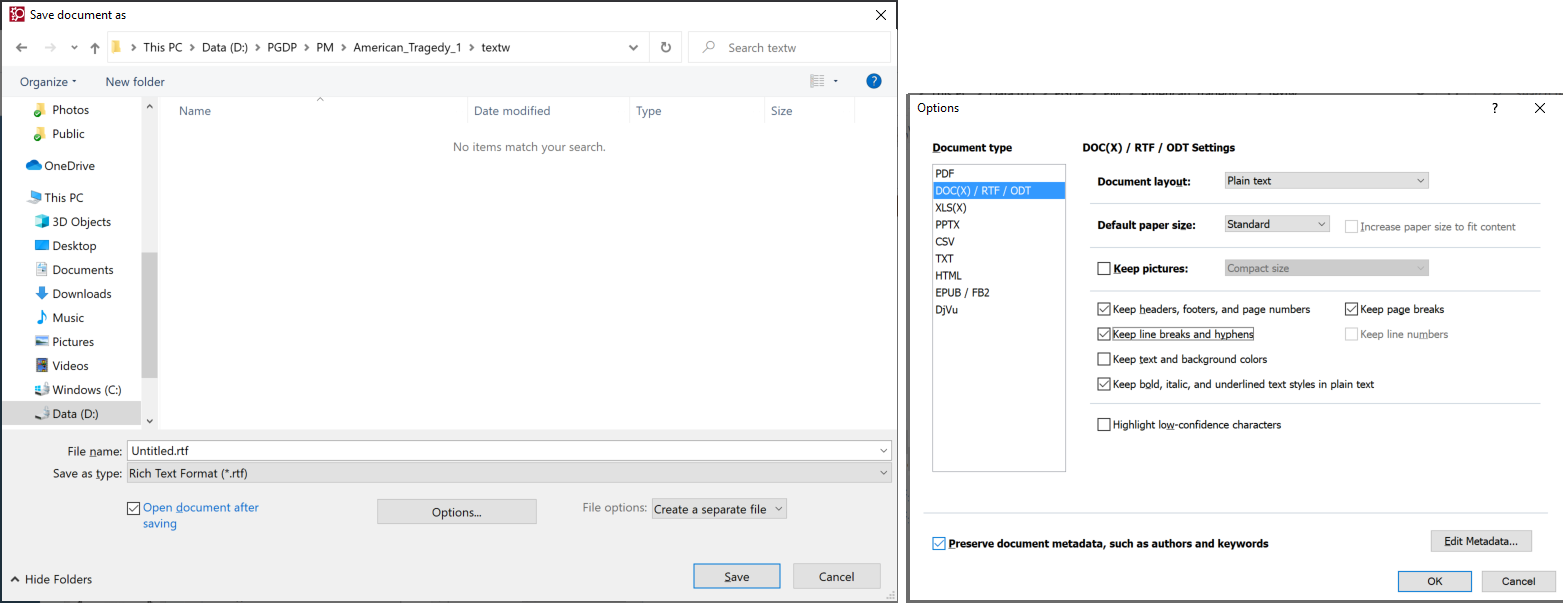
In the "textw" directory, save the text with the settings: Save as type Rich text Format and Create a separate file for each page. In the options window, check Keep page breaks and Keep line breaks and hyphens and you can go either way on everything else, except that they should match the items checked in the textwo generation. You may choose to remove headers and footers in FineReader or not, as long as it matches what you choose in generating textwo. It is important to NOT remove headers & footers in both the OCR program AND guiprep, you may do it in one or the other, or neither. It doesn't matter what the File name is set to, again, as long as it matches the name used in textwo generation.
If the Options window is open, hit OK. Hit Save.
To generate the textwo files, go to the menu and hit File => Save As => RTF, as above, and then navigate to the textwo directory, or if the directory does not yet exist, create a textwo directory with the same parent as the textw directory using the New Folder button.
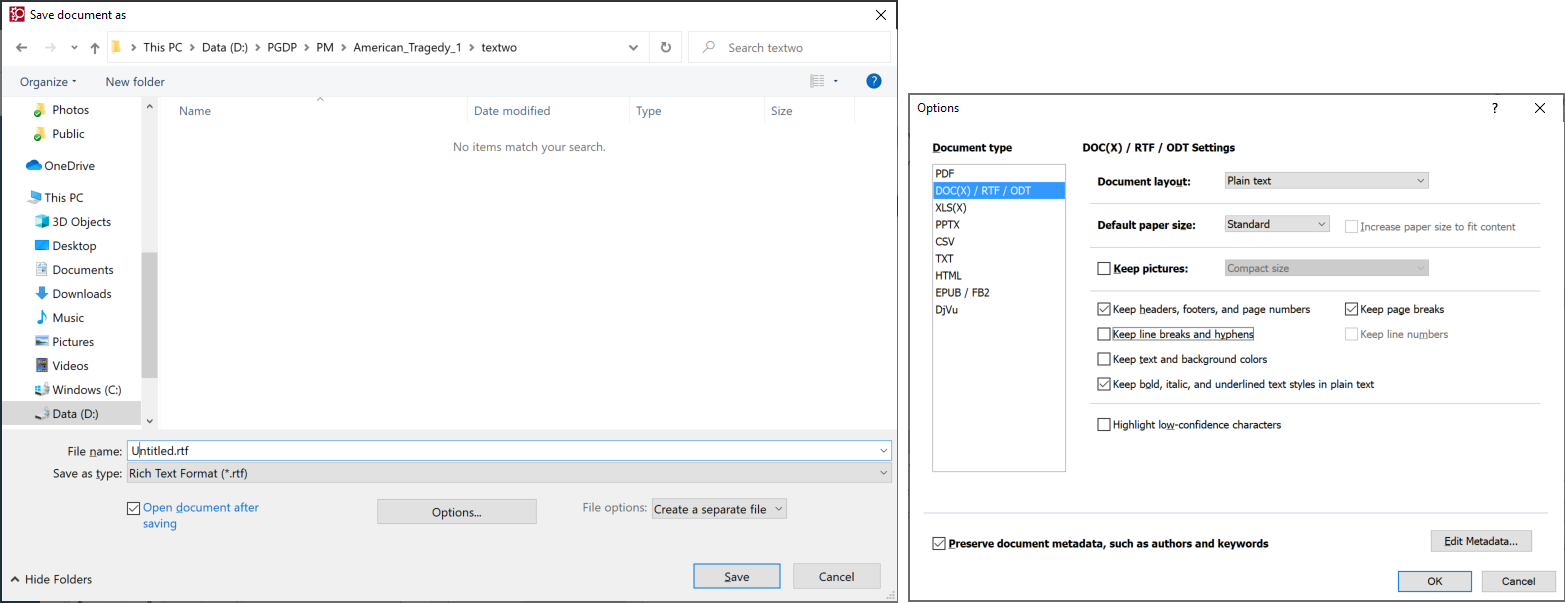
In the "textwo" directory, save the text with the settings: Save as type Rich text Format and Create a separate file for each page. In the options window, check Keep page breaks and uncheck Keep line breaks and hyphens. Make sure that all the other check boxes match what you used in generating the textw files, and use the same file name.
If the Options window is open, hit OK. Hit Save.
If you are creating textw and textwo files for the first time, save your OCR project so that you can regenerate the output files easily. That way you can experiment with different options.
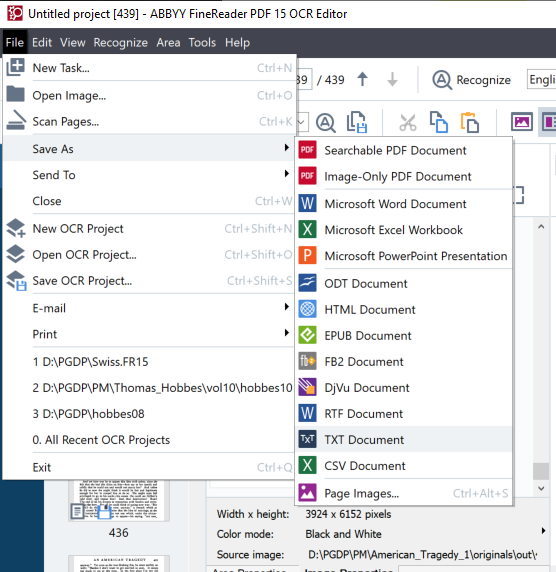
In ABByy after all of your images are loaded and OCRed, select File => Save Text As => TXT
In the dialog box that pops up navigate to the textw directory, or if the directory does not yet exist, create a textw directory in some appropriate parent directory using the New Folder button.
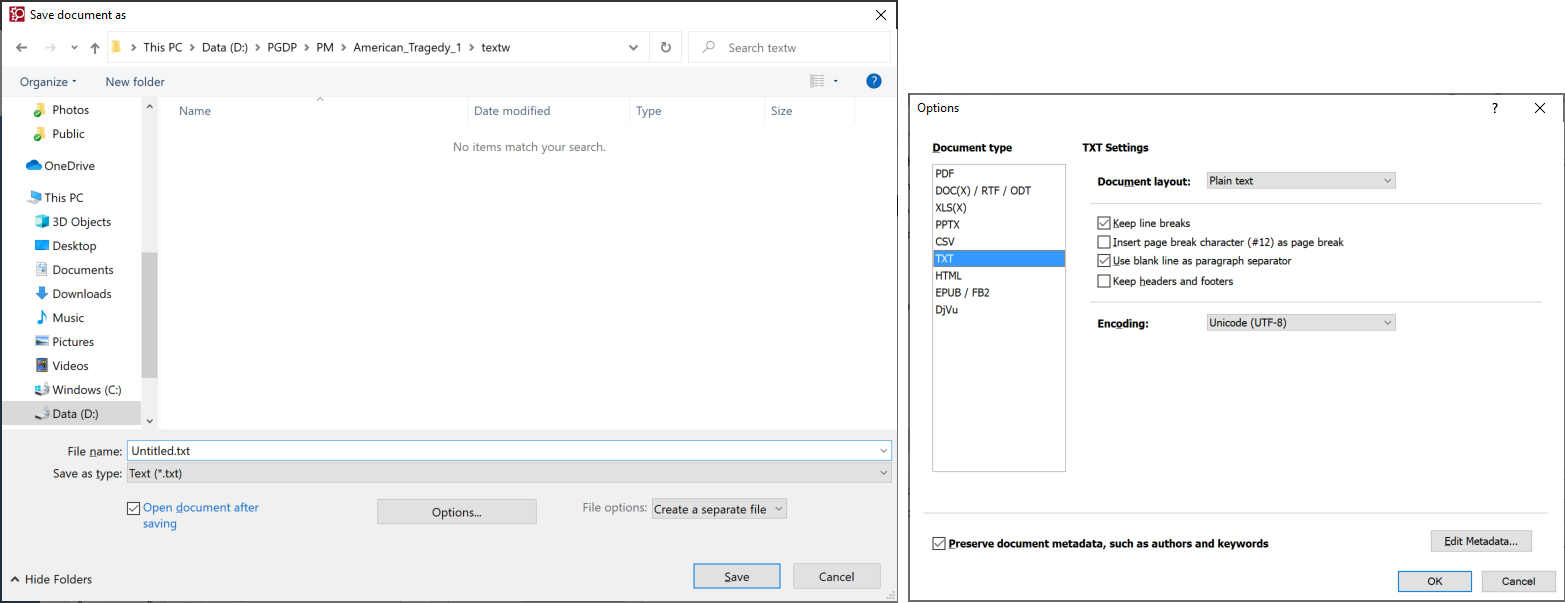
In the "textw" directory, save the text with the settings: Save as type Text and Create a separate file for each page. In the options window, use options exactly as they are shown in the illustration above, check Keep line breaks and Insert blank line as paragraph separator, and uncheck Insert page break separator. You may choose to remove headers and footers in FineReader or not, as long as it matches what you choose in generating textwo. It is important to NOT remove headers & footers in both the OCR program AND guiprep, you may do it in one or the other, or neither. Use Unicode(UTF-8) for the Encoding, even if your file does not require that much sophistication, as our upload process is rapidly moving towards not accepting files that are not UTF-8 encoded. (In older versions of FineReader, this setting was called Code Page.) It doesn't matter what the File name is set to, as long as it matches the name used in textwo generation.
If the Options window is open, hit OK. Hit Save.
To generate the textwo files, go to the menu and hit File => Save As => TXT, as above, and then navigate to the textwo directory, or if the sub-directory does not yet exist, create a textwo directory with the same parent as the textw directory using the New Folder button.

In the "textwo" directory, save the text with the same settings as for textw, except uncheck Keep line breaks. It doesn't matter what the File name is set to, again, as long as it matches the name used in textw generation.
If the Options window is open, hit OK. Hit Save.
If you are creating textw and textwo files for the first time, save your OCR project so that you can regenerate the output files easily. That way you can experiment with different options.
If you are using a different OCR package that can't save as rtf or do automatic line rejoining, you may need to skip those two functions. Save the files in a directory named "text" using the same settings as for textw without RTF extraction above. Uncheck both Extract and Dehyphenate under the Process Text tab.
Guiprep expects to find textw and optionally the textwo with the same parent directory. The output of dehyphenization will be placed in the text directory, also with the same parent directory, which will be created if it is not present. If you are going to use guiprep to rename or optimize your png files, then there should also be a pngs directory as a sub-directory of the same parent directory, containing all the png files. If you are going to use guiprep to create a project zip file, then illustrations, covers and high resolution title page should be in the images sub-directory of the same parent directory.
Parent directory
  ├ textw
  ├ textwo (optional)
  ├ text (will be created if not present)
  ├ pngs (required if png file features are to be used)
  └ images (only needed if you intend to create a project zip file through guiprep for upload to Distributed Proofreaders)
If your computer runs Windows, there is a file in the distribution called run_guiprep.bat. Double-clicking on this file will start guiprep. (Older distributions of guiprep contained winprep.exe or run_guiprep???.bat [where ??? is the version number]. If you have any of these files on your computer, you should consider upgrading.)
In all cases, you can start guiprep from a command prompt. Guiprep will only work properly if started in the guiprep directory, the one that was unzipped during installation.
cd <guiprep directory>
perl guiprep.pl
For instance, on my computer I start the most recent version of guiprep with
cd \pgdp\guiprep
perl guiprep.pl
(The change directory command may have a different syntax on your computer.)
When guiprep starts, it will open to the Select Options tab. Once you get the settings you want, you will need to look at this tab very infrequently.
Default Markup is only used if you are starting from rtf files, not for .txt files.
In the first set of options:
In the scrollable list of options below that, the following are primarily of historical interest, and generally should be unchecked:
The bottom two options in each column will put curious messages of the form [*blah blah] in your text if they encounter anything they consider undesirable. (Yes, just one asterisk.) If you use them, consider resolving or at least removing these messages before uploading the book to the web-site. These messages are known to confuse P1s. The entries that cause these insertions are:
If you are working on a book that contains mathematics, then you may want to uncheck:
All of the options are covered in the Detailed Functionality below.
Once you have these options the way you want them, go to the Change Directory tab.
If you have multiple disk volumes on your computer, select the drive containing the project you want to process.
Ignore the right hand directory listing, it is used for batch processing which is not covered in this Quick Start Guide. For interactive mode, just focus on the left hand directory listing, underneath the title Change To Directory. In that list find your parent directory and open it. The directory list should now show textw and anything else you have put there, and the banner above the tabs should read: Working from the ...your parent directory... directory.
Then go to the Process Text tab.
The options in the Process Text tab:
At this point the status window in the lower left hand corner will have one of the two following messages.
Working in interactive mode.
This means that the processing will run in "interactive mode" rather than "batch mode", in the "Working from" directory at the top of the window.
Selected Directories to Process: ...
This means that the program is running in batch mode. It will work, but you won't be able to run Headers & Footers or Search without first going to Change Directory. It also means that what is displayed in the "Working from" statement at the top of the screen is NOT indicative of what directory(ies) will be processed.
Hit the Start Processing button and watch it run. If you are working on a large book, or you are running pngcrush, this can take some time, so run it in the background and go to the web site and do some proofing or formatting, or pick out a book to smooth read. Your project will be busy with your computer for a while.
When the processing completes, the large log window will end with:
Finished all selected routines.
At this point you can use the Search tab or the Headers & Footers tab, run some options on the Process Text tab that you skipped or exit the program.
In this section, each tab will be examined in detail.
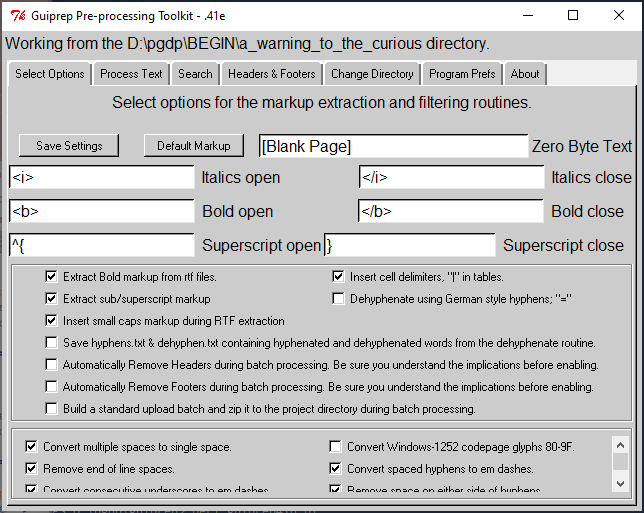
The Select Options tab will allow you to adjust the markup used for italics and bold extraction and set the options you want the filter routine to run. The other settings are all options for the filter routine. See discussion below under Filtering for suggestions and explanations for the various settings.
These options only apply to processing of .rtf files. If processing .txt files, they do nothing.
These options apply to .rtf input and .txt input.
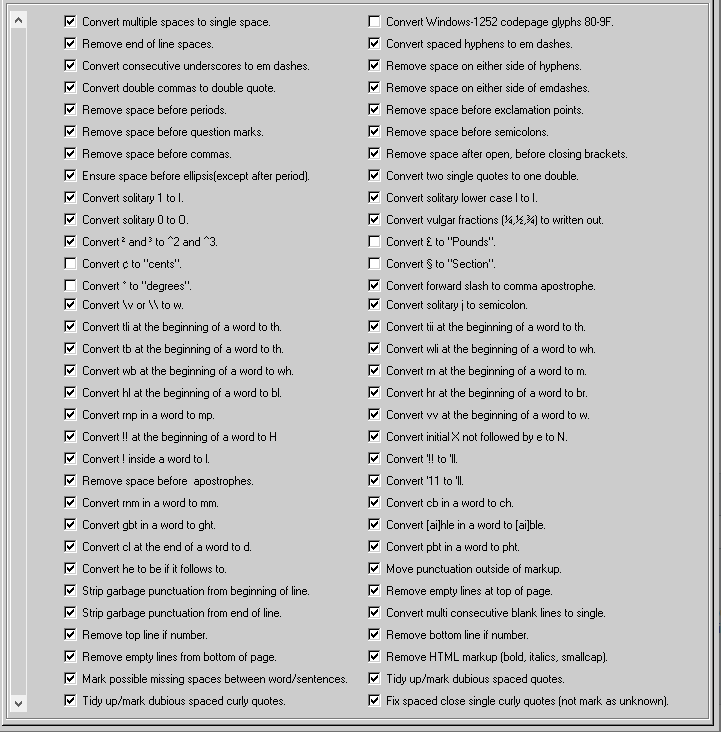
The above illustration is the fully expanded area which displays as the last few lines on the Select Options tab. I widened it to avoid clipping text on some of the options with longer names. Most of these options are self explanatory, but there are comments. The options can all be selected or deselected independently.
Filtering applies to .rtf and .txt files.
As of now, the pattern substitution/filtering functions the script will perform are:
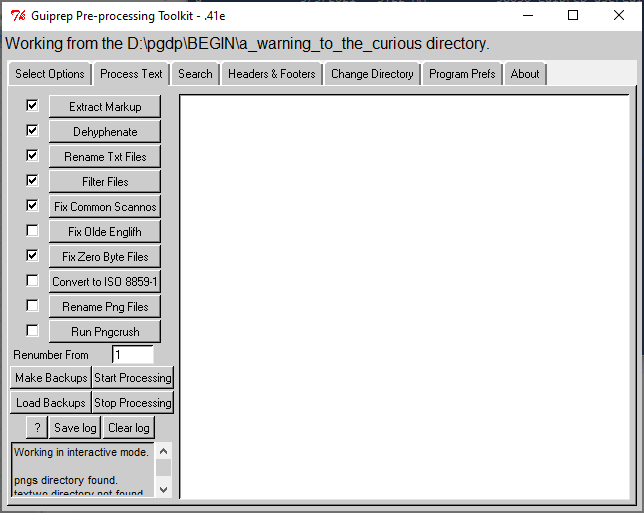
This tab assumes that you have set your processing options in the Select Options tab, and you have visited Change Directory to either setup a directory for "interactive mode" processing, or selected one or more directories for batch processing. In this tab you can run the different routines on the text files. If you are starting with rtf files, you must run Extract Markup in order to generate the .txt files which are required for the following routines. And if you are starting from .rtf or from .txt files in "textw" and optionally "textwo", then you must run Dehyphenate to populate the "text" directory before running the other text processing routines. The routines which follow Dehyphenate and further process the text will expect to find a "text" directory populated with .txt files, regardless whether they are output from Dehyphenate, directly output from your OCR or come from elsewhere.
Generally the user specifies all the routines to be used on a project and then starts processing. However it is conceivable that you could just specify one routine, process it, inspect the output, and then go on to the next. The routines are ordered on the page so that they will work optimally, so if you choose to run them individually, it is best to run them in order from top to bottom (skipping any you don't want).
The Extract Markup routine expects to find the directory "textw" (and optionally "textwo") with rtf format files in them. It will extract the text and markup and put the extracted files in the same directory with a .txt extension.
The Dehyphenate routine expects to find the "textw" and optionally "textwo" directories populated with .txt files. Whether the .txt are as a result of the Extract Markup routine or .txt format files saved directly from OCR or you typed them in, is immaterial. It tries to reconnect words that are broken at the ends of lines. It will put the resulting dehyphenated files into a directory named "text", creating it if it doesn't already exist. **WARNING: any files with a .txt extension in the "text" directory when Dehyphenate runs WILL BE DELETED. WITHOUT WARNING OR ASKING.**
The Rename Txt Files routine expects to find the "text" directory populated with .txt files. It renames the files into the format expected by the web-site, i.e. 001.txt, 002.txt, ... starting from whatever value is in
Renumber from
below.
The Filter Files routine expects to find the "text" directory populated with .txt files. It applies the filtering options selected on the Select Options tab.
The Fix Common Scannos routine expects to find the "text" directory populated with .txt files. It contains a list of over 3000 common mis-scanned English words and corrects them. Many other commonly mis-scanned words would be corrected by the filtering replacements, and these are not duplicated on the included scanno list, so if you are trying to eliminate as many scannos as you can, make sure you run Filter Files as well. Some comments below about this routine.
The Fix Olde Englifh routine expects to find the "text" directory populated with .txt files. It looks for words that probably contained the Old English long s (ſ) but were OCRed with f. It replaces the offending f with s. This is valuable for use with very old texts that contain long s, however it is an abomination when used on text that do not contain long s, as it will try to convert words anyway. Use this routine ONLY on projects that are known to contain long s. USE WITH CARE.
The Fix Zero Byte routine expects to find the "text" directory populated with .txt files. It looks for text files with no content (or just utf-8 BOM) and inserts [Blank Page].
Convert to ISO-8859-1 expects to find the "text" directory populated with .txt files. This routine is not compatible with utf-8 output, so it should not be used. DO NOT USE. It is maintained for the time being for users who have not converted to utf-8, however expect it to be removed in a future release.
Rename Png Files does not process the text files. It expects to find the "pngs" directory (or other name specified in Program Preferences) populated with your .png files. It will rename all of the .png files in the upload format, i.e. 001.png, 002.png, ... starting from whatever value is in Renumber from below.
Run Pngcrush expects to find the "pngs" directory (or other name specified in Program Preferences) populated with your .png files. It will run pngcrush on each file to optimize the compression and reduce the size. The default settings will reduce the palette to the minimum necessary. It does save the original files in a directory " _pngsback_" so you can easily recover them. If interrupted part way through, it will pick up where it left off the next time you start it. As a consequence, if you interrupt it, the pngs directory WILL NOT have all of the files in it. Make sure you have the same number of text and png files before you upload them.
Renumber from is used by Rename Txt Files and Rename Png Files above.
Some comments by the author of the program regarding the Fix Common Scannos routine:
The word list was derived from Moby project data, cut for top 2000 frequency and word of 6 characters or less (to reduce size and assuming that longer words will be closely examined by the proofreaders). The resulting list was processed through perl scripts which generated scannos by replacement. This result was then filtered to eliminate valid words from the generated "error" list to eliminate false positives.
The common scannos from gutcheck and PRTK were then added, as well as some additional scannos provided by numerous DP proofreaders.
The resulting list was then tested against just over 1 million words of raw OCR output provided by charlz. Further false positives were discovered and removed. The actual hit rate for this code is about 1 scanno detected per 30k words of input text. The actual accuracy rate against the corpus provided by charlz is: 2 false positives out of 122 scannos detected, or 98.3% accurate. Seems worthwhile to me. :)
And more recently:
The scannos word list was pulled from the Distributed Proofreaders CVS site. There are approximately 3400 words in the scannos list (though the improbable letter combination filters make about 330 of them redundant).
The previous version of the manual had this statement:
If you come up with misscanned word that you think should be in the scanno list, let me know. Words that commonly are misscanned for each other (like bad / had or and / arid) are NOT good additions. Those are better off in Big_Bills' stealth scannos list.
I am not aware of a maintained entity named "Big_Bills' stealth scannos list". Big Bill is no longer active in Distributed Proofreaders.
As to who to let know regarding additions, until we have a programmer who is dedicated to maintaining guiprep, it might be good to just keep a list of your own and wait.
The Start Processing and Stop Processing buttons will start and stop processing. They detect whether batch processing or interactive processing was requested on the Change Directory tab and proceed appropriately.
Make Backups copies the .txt files in "text" to the directory "textback", creating the directory if it does not exist. Load Backups copies the same files back to "text".
? will pop a terse help message.
Save Log saves the session log (the large text area on the right of this window) to the file processlog.txt in the guiprep directory.
Clear Status Box will clear the messages from the status box (the large text area on the right hand side of the window).
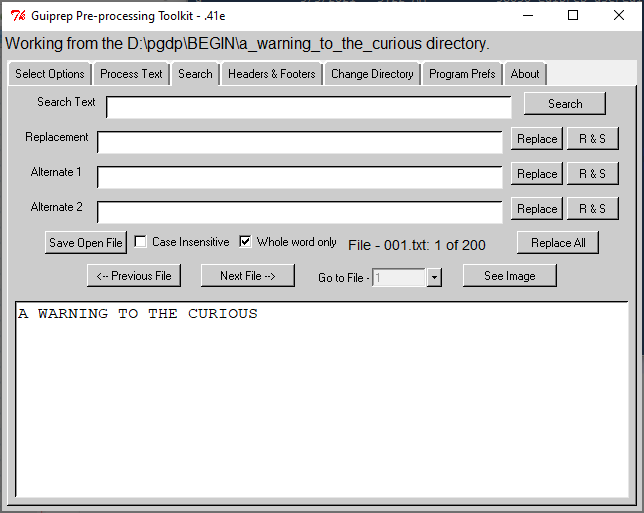
The Search tab only works in interactive mode, which means that it works in the directory identified in the banner above the tabs, "Working from the ... directory." In the illustration shown above from my computer, no searches will be possible without resetting the directory, because D:\PGDP\PM is the grandparent of many text directories, not the direct parent of them.
The Search tab only works after Dehyphenate has run, and put the final .txt files in the text directory. (Any other of the Process Text routines may also run prior to search, or not. Dehyphenate is the only routine that Search has a dependency on.
The Search tab has search and replace functions that will search through the text files and display the files with the search term and allow you to modify them, if desired. It is handy to check for project specific scanning errors or to check up on synchronization errors during dehyphenization. (Search for '**'.) Maybe after you have done all your processing, you decide to check for comments inserted by the filtering options, search for '[*', and then resolve each problem. You can edit the text in the lower display portion of the window and it will be saved.
There are some options to do case insensitive searching or search for whole words only to narrow down what the search function will find.
When you perform a search, if the search text is found, the whole file it is in will be displayed in the text window with the found text highlighted and the cursor just before it. If the search text is not found in any of the remaining files, a message box will pop up informing you.
The buttons are pretty self explanatory. The Save Open File button saves the text that is currently displayed in the window to the file, overwriting the original. (It appears the moving to another file by doing a search or hitting one of the other buttons will also save the open file, so this is only a convenience.) Search looks for the next occurrence of the search term. If you already have a text file open and press Search, it will proceed with the search starting from the open file. Replace substitutes the Replacement Text for the Search Text in the window, and saves the file. To cancel an in progress search, change the Search Text, that will reset the file index counter to the beginning. Replace & Search (R & S) just combines the Replace and Search buttons into one function call. Replace All will call Replace and Search until all of the files have been searched. Replace All uses the Replacement text, not one of the alternates. Replace All will reset the file index counter to zero before it starts so if you are performing a manual search, get halfway through the files and then press Replace All, it will start over again at the first file.
The Previous File and Next File refer to the previous and next files in numerical order, not the previous and next search results. See Image will work if you have set up an image viewer on the Program Preferences tab.
The Headers & Footers tab only works in interactive mode, which means that it works in the directory identified in the banner above the tabs, "Working from the ... directory." In the illustration above from my computer, work on headers and footers will not be possible without resetting the directory, because D:\PGDP\PM is the grandparent of many text directories, not a direct parent of a text directory.
The Headers & Footers tab only works after Dehyphenate has run, and put the .txt files in the text directory. Any other of the Process Text routines may also run prior to working on the headers and footers, or not. Dehyphenate is the only routine that Headers & Footers has a dependency on.
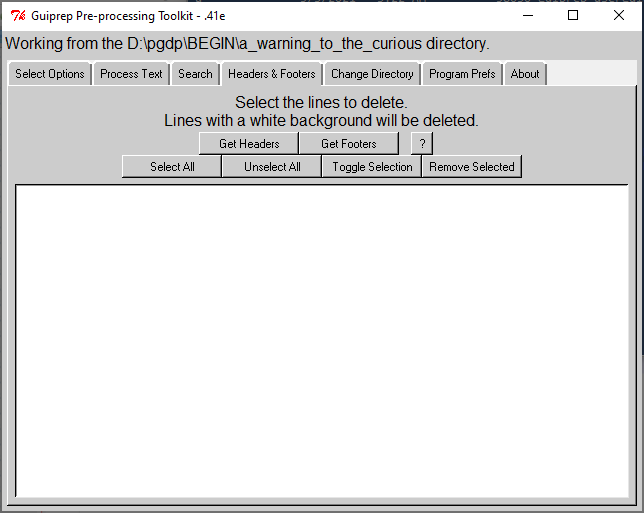
In this tab, you can select or omit headers or footers to be deleted. This is a semi-automatic process.
To get started, press the Get Headers or Get Footers button. Headers will sometimes contain the book title, or a page number, either of which you would want to remove. On the other hand, the first line on the first page of a chapter is frequently the chapter title, which should be kept. Look through the list of headers (or footers) and select the ones to be removed. Lines with a white background are selected for removal, lines with a dark background are not selected. If you are only keeping the top line on front matter pages and chapter heads, it may be quicker to hit Select All and then de-select the ones to be kept. Once you have the ones you want removed selected and the others not selected, hit Remove Selected. On a recent book, I found that FineReader had split many of the headers to two lines, so I iterated this process.
? gives a terse help statement, and Unselect All and Toggle Selection should be obvious, and if you don't find them to be obvious, they are non-destructive, so play with them.
There is a hidden feature of this page. If you have set up a text viewer and an image viewer on the Program Preferences tab, then double clicking on a listed header or footer will pop-up the full text of the page in the desinated text viewer. (You could also edit and save the file, although if you do that, make sure to rerun Get Headers or Get Footers before hitting Remove Selected.) Similarly, if you left-click and then right-click on a listed header or footer, the png file will pop-up (if the pngs are in the "pngs" is a sibling of the text directory, or other name if it was specified on the Program Preferences tab).
If you accidently delete lines of text that you would have rather kept, you can always regenerate the "text" directory by rerunning the routines from the Process Text and regenerate "text" from "textw" (and optionally "textwo"). Alternatively, if you think it is likely that you will overdo the deleting of lines of text, you could start in Process Text and Make Backups before working in the Headers & Footers tab.
Older releases of Guiprep ran under a program called winprep.exe. Winprep would not allow the invocation of external programs, so displaying the text of the full page or displaying the png would not work if you were using winprep. All recent releases have discontinued the use of winprep.
If you use Irfanview, for best results, set View->Display options to 'Fit only big images to window'.
If you use XnView, it's a little more complex. Go to Tools->Options->View and check 'Maximize view when open' and set 'Auto image size' to 'Fit image to window, large only.' Go to Tools->Options->Misc and check 'Remember last position/size'.
*Caveat* There is a bug in the command line parsing in XnView. If you have a directory with a space in the name, in the path to XnView (like 'Program Files' for instance), it will fail with a 'File not found' error. As long as there are no directories with spaces in the name in the path, it will work fine. Irfanview and other image viewers I have tested don't have this problem.
This section assumes that you have organized your directories as described in Directory Setup.
In this section you will designate whether you are working in interactive mode or batch mode, although that designation will be implicit rather than explicit.
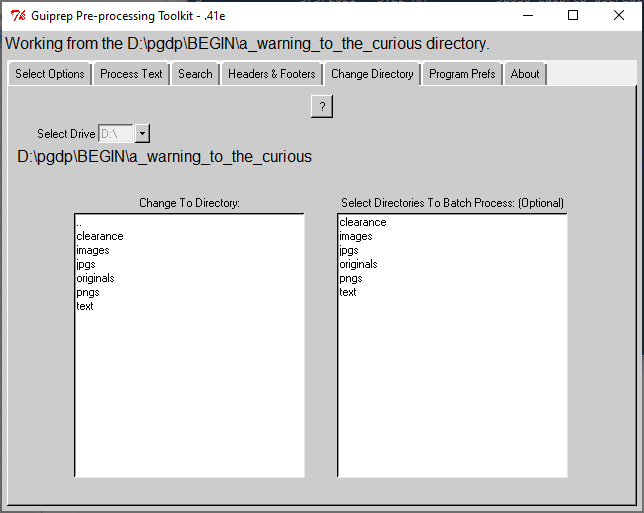
To work in interactive mode, ignore the right hand navigation window and only work in the one on the left, the one that has Change To Directory: written above it. In that navigation window, find your text or textw directory. To open a directory, double-click on it. Double click on ".." to go up one level in the directory hierarchy. You can also use the Select Drive drop down to select a different drive.
When you have your the appropriate directory open, textw and any other sub-directories will be listed in the Change To Directory: list. Also, in the banner at the top which says Working from the ... directory., your parent directory name will appear.
At this point you can change to the Process Text tab, Search tab or Headers & Footers tab and work on the project in any of those tabs.
To work in batch mode, navigate using the left hand navigation window (Change To Directory:) to get to the grandparent of your text or textw directories, in my case, D:\PGDP\PM. This navigation works exactly like finding your parent directory for interactive mode, except you are looking for the parent of the parent directory. Then in the right hand window (Select Directories to Batch Process: (Optional)), select the directories that you want to process. Clicking a directory name in this window will toggle it between selected (gray background) and not selected (white background).
Once you have selected the directories you want to process, you may proceed to the Process Text tab. Search and Headers & Footers do not work in batch mode, even if you have identified a batch which only contains one directory.
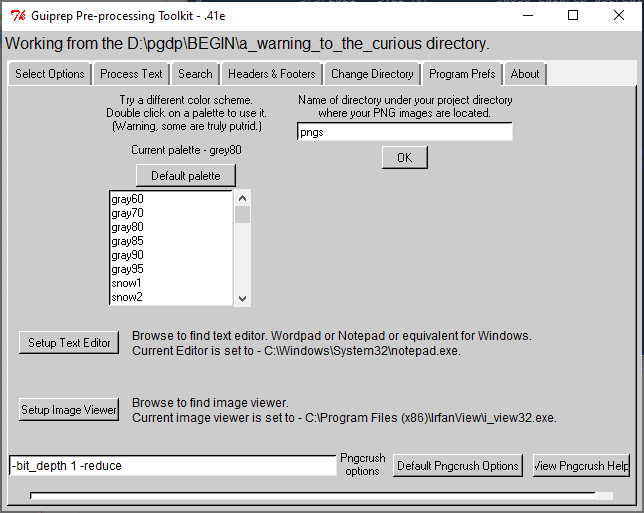
In the Program Preferences tab you can set some preferences which affect how the program looks and runs. You can change the color palette the the script uses, you can associate a text editor with the script to allow easy checking and editing of files while you are doing header removal and you can associate an image viewer to do side-by-side comparisons with text.
This manual was produced with palette is Gray80. The original author also liked CornSilk2, PeachPuff2, Bisque2, CadetBlue3 and Ivory3. The original author also found some to be truly painful: chartruse1, IndianRed1, brown1 and DarkOrchid2. Ouch!
You can now specify what the name of the directory containing your png files is on this tab. Default is "pngs" and is standard for users of our site. Avoid using directory names with spaces in them. And the current author would appreciate it if you would NOT use this feature, and stay with "pngs" as the name of the directory that contains your .png files. Having standard names for such things makes troubleshooting and technical support easier.
For Windows users, you will probably want to use Wordpad or Notepad or some equivalent for your text editor. Irfanview or XnView or an equivalent for an image viewer.
The default locations for notepad and wordpad are:
Win 7, 8 (really?), 8.1 (you have to be kidding), 10:
C:\Windows\System32\notepad.exe
C:\Program Files\Windows NT\Accessories\wordpad.exe
Win XP (and many older versions):
C:\WINDOWS\Notepad.exe
C:\Program Files\Accessories\WORDPAD.EXE
If you encounter problems with guiprep, please record the exact sequence of events that cause the problem, and see if it is repeatable.
Edit the guiprep.bat file in the guiprep directory, and create a new line at the bottom with the word "PAUSE" (no quotes, but all caps is preferred). That will keep the Perl window open after guiprep quits. Copy any text out of that window after the error occurs.
Once you have all this information together, please report the problem in the guiprep forum on Distributed Proofreaders. Please also mention the version of guiprep you are running (which should be in the title bar of guiprep), your Perl version and your operating system and version. Alternatively, you can report the problem via the GitHub guiprep issues page.
These were in the previous user guide. I don't know which are still outstanding or which have been resolved.